Welcome to this year in animation!
This year may look very different than usual but we will learn some fantastic things and improve our skills! We will be working on new skills throughout each week on many different fun and exciting projects! Most, not all, of the assignments for the year will be below to give you an outline on what to expect as well as what we will be doing this year. The directions will be below for each project. Homework will also be listed below for each project . Get excited because I know I am!
You will need a …
NOTEBOOK, SKETCHBOOK, AND PENCIL WITH AN ERASER!
We are going to have an absolutely wonderful year and I can’t wait to see what you create!
Assignment 1: An Intro to animation
This year we will be starting out with an opening presentation on animation as a whole to understand what you will be learning and working on during your time here as well as a better understanding on what exactly animation is. We will be learning a little history and understanding a bit better with this presentation to ease you in and get you guys excited to learn this awesome skill!!
-Presentation on animation:
https://docs.google.com/presentation/d/11TFtto98WXpg07eRrQzd-AvLH8ITWBbsNYc8qtPn_qo/edit?usp=sharing
-Short video & Worksheet: https://forms.gle/BnNrJPwjvenvYyCW9
Assignment 2: Getting to know you!
Complete here! : https://forms.gle/DtjSSWQtHhAPZDYp8
Make sure your are doing all of your assignments in your sketchbook.
Assignment 3: An Intro to the 12 Principles!
Watch the short video and complete worksheet: https://forms.gle/Q7yRisH3NPKEgt6Z8
Assignment 4: An Intro to drawing and the basic shapes
-What are the FIVE basic shapes? Write them down in your sketchbook then show me!
-Draw ONE of each of the basic shapes. Pay attention to your LINE QUALITY, how much pressure you are putting on the pencil and size of the shapes.
Assignment 5: Drawing the basic FORMS
-Answer the question in a paragraph: What is the difference between forms and shapes? What are the names of the 5 3D forms? ANSWER HERE: https://forms.gle/ZW9T9N2rabxT1ddv7
-THEN Draw 5 of each of the 3D forms, again, keeping in mind width, height, volume, and negative space.
Remember: They should be exactly identical to each other as possible. Hint: Pay attention to the space inside the shapes and compare all your shapes to the first one that you have drawn.
Assignment 6: An Intro/REVIEW to SHADING
-Answer the question in paragraph form: What do you think a light source is? What do you think shading is? How do you think light will effect your drawing? What would happen if there was no light source in a drawing?
ANSWER HERE: https://forms.gle/6JnPMdkYZpA9uHfR7
THEN: Shade 5 gradients going from light to dark changing the pressure that you are putting on the pencil. (remember: we can always make something darker but it is hard to make a drawing lighter)
Assignment 7: TEXTURES
Assignment 7.5

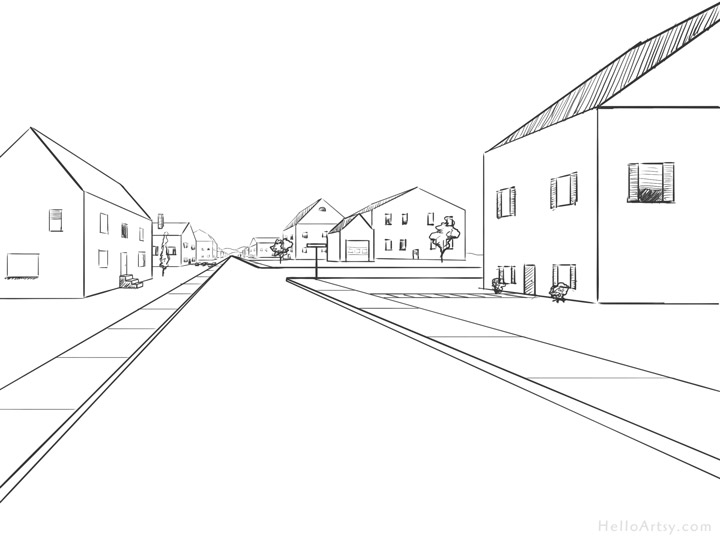
Assignment 8: One point perspective scene
-Answer the question in a paragraph: What is perspective? What are the components included and crucial to one point perspective?
We will be drawing the image below. We will be drawing it together and your homework will depend in which step you are on. The steps are listed below and they will have a homework number next to them.
1. The first step is to find the horizon line and vanishing point.
2. The next step is to start breaking down the scene, in this case there are many buildings. Pay attention to where the buildings are in this scene and compare it to where the vanishing point and horizon line are (use them as a reference and look at your negative space.
3. Start putting the road and sidewalks in but watch how wide the road it.
4. Then put the buildings in one by one (start in the back.)
5. Move towards the buildings in the front (only the basic shapes.)
6. Clean up your entire scene
7. Begin adding the line and the details to the buildings in the frot and then more towards the back. (Remember: Details on buildings are small. Keep in mind how small your door or the window in your house looks compared to the whole building.)
ALWAYS bring a sketchbook and pencils
7th:
8th:
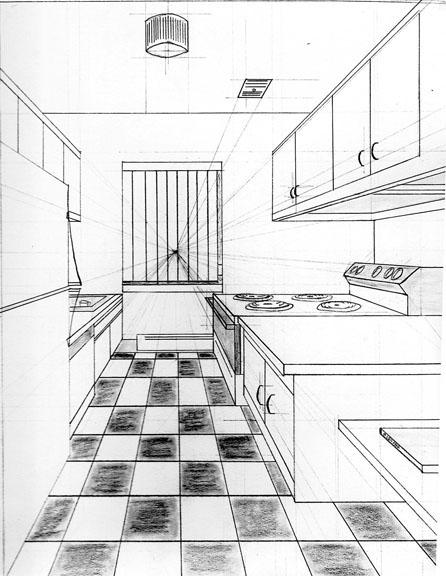
Assignment 9: One point perspective scene INTERIOR
-Answer the question in a paragraph: What is the difference between an interior and an exterior? Why do you think that?
We will be drawing the image below. We will be drawing it together and your homework will depend in which step you are on. The steps are listed below and they will have a homework number next to them.
1. The first step is to find the horizon line and vanishing point.
2. The next step is to start breaking down the scene, in this case there are many distractions but not many actual large objects. Pay attention to what the large basic shapes are in this scene and compare it to where the vanishing point and horizon line are (use them as a reference and look at your negative space.
3. Start putting the walls and the ceiling and ground in but watch how wide and the length they all are.
4. Then put the large basic shapes in one by one (fridge stove, countertops (start in the back with absolutely no detail.
5. Move towards the objects in the front (only the basic shapes nothing other than one of the 5 basic shapes.)
6. Clean up your entire scene as this should be mapped out for you to start adding your details
7. Begin adding the line and the details to the buildings in the froNt and then more towards the back. (Remember: Details are small. But they are also STILL IN PERSPECTIVE)
ALWAYS bring a sketchbook and pencils
7th:
8th: go ahead and add your own characters when you’re done! 
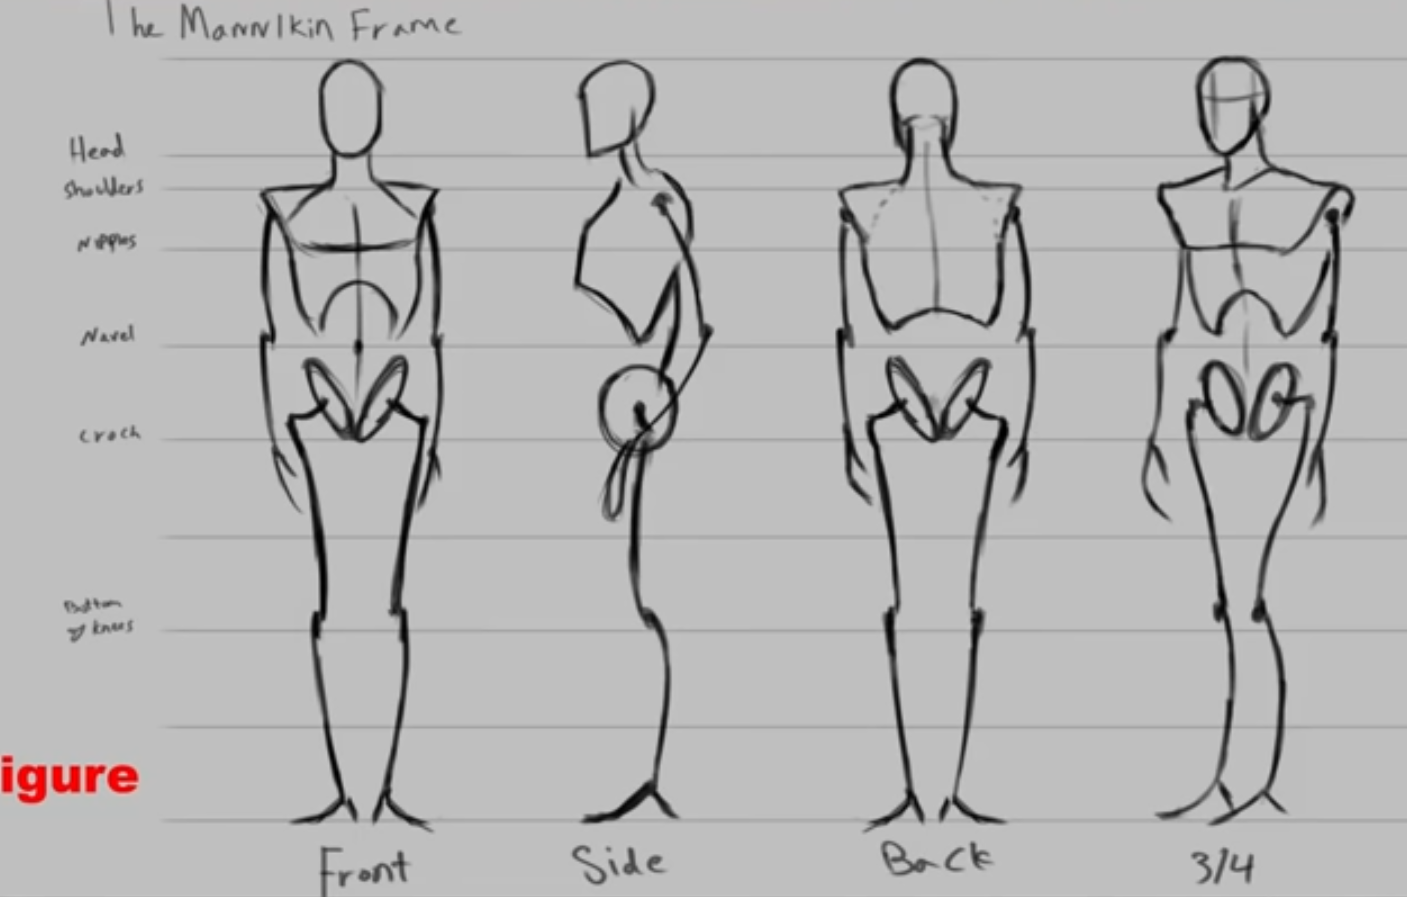
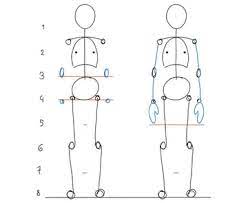
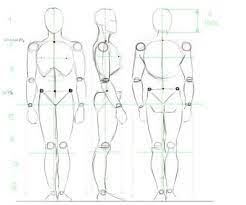
Assignment 9: Body anatomy
-Answer the question in a paragraph: What does ON MODEL mean? Why might this be important to us?
Since we have been introduced to simple cartoon anatomy, we are going to expand your knowledge a little by learning about a more realistic human anatomy. Humans proportions are less exaggerated and are more complex. The steps to create a human are very similar though so we will be following some of the same steps. Your homework will depend in which step you are on. The steps are listed below and they will have a homework number next to them.
1. The first step is to look at the person and break them down into basic shapes. What shapes are they made of? The shapes will most likely be combined with other shapes. (if you need to you can draw lines and think of them as bones. Then add the basic shapes after)
2. Find the spine line. Where is this characters spine? Lets imagine we can see him in 3D. Where would it be if this character was alive?
3. Lets start mapping this character out. Start with the spine (keeping in mind the size of the character compared to the size of it’s spine.) After we have the spine, lets layer the character’s basic shapes on top while keeping in mind human anatomy.
4. Change the shapes size and variables depending on the person we are drawing.
5. After we have the basic shape(s) for the torso, lets move on to the feet and hands. . *Remember the size proportions. Do they match with the characters hands and feet size?
6. Lets begin to connect the hand and feet to the body with lines. Add a break if the knee or arms are bent.
7. Lets add weight to the characters arms and legs. Changing from lines to their basic shapes.
8. Lets add the basic shape for the head. This is another breakdown. Keeping in mind the size proportions and always NEGATIVE SPACE!
9. Everything should be broken down now. This breakdown should resemble a human. We will now add our curves and polish our lines for the actual finished person. We will start with the torso and move to the arms, legs, hands. and feet.
10. Finally we will breakdown the face and head. Use your negative space and size proportions to the character.
11. We will clean up the drawing!


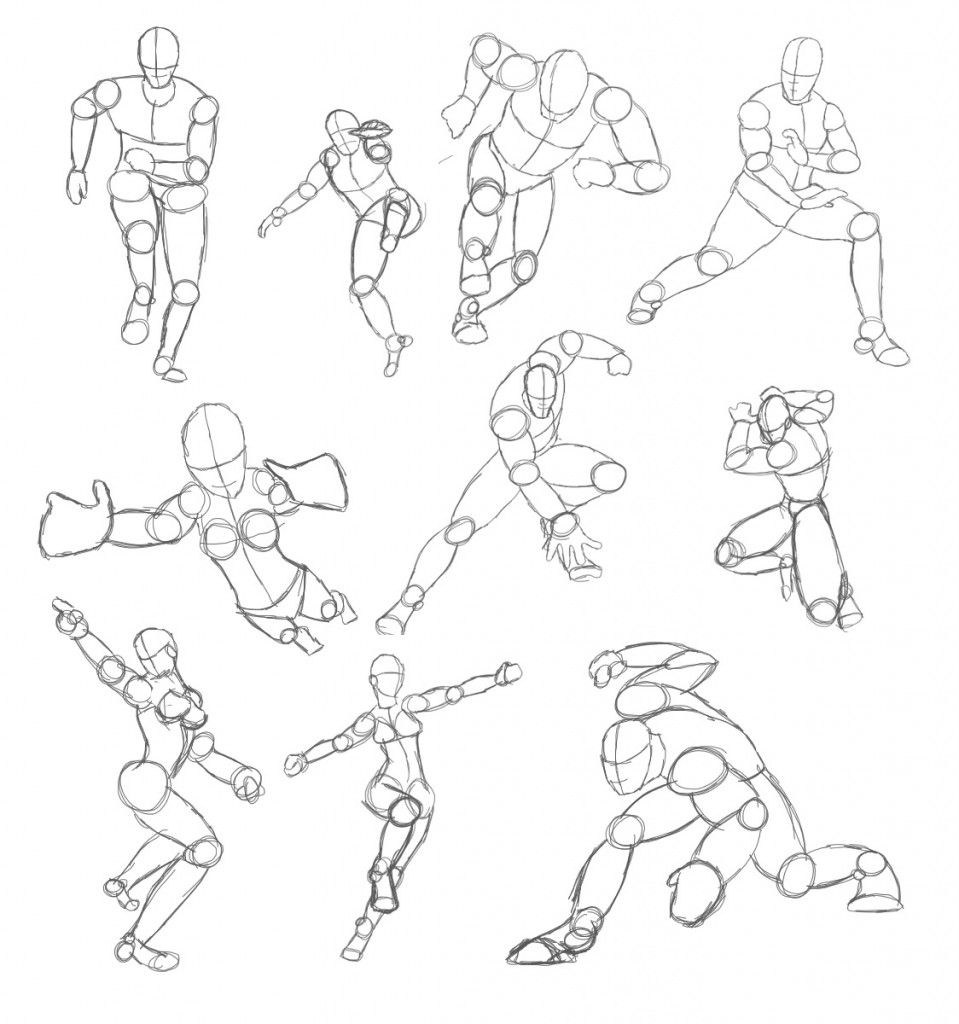
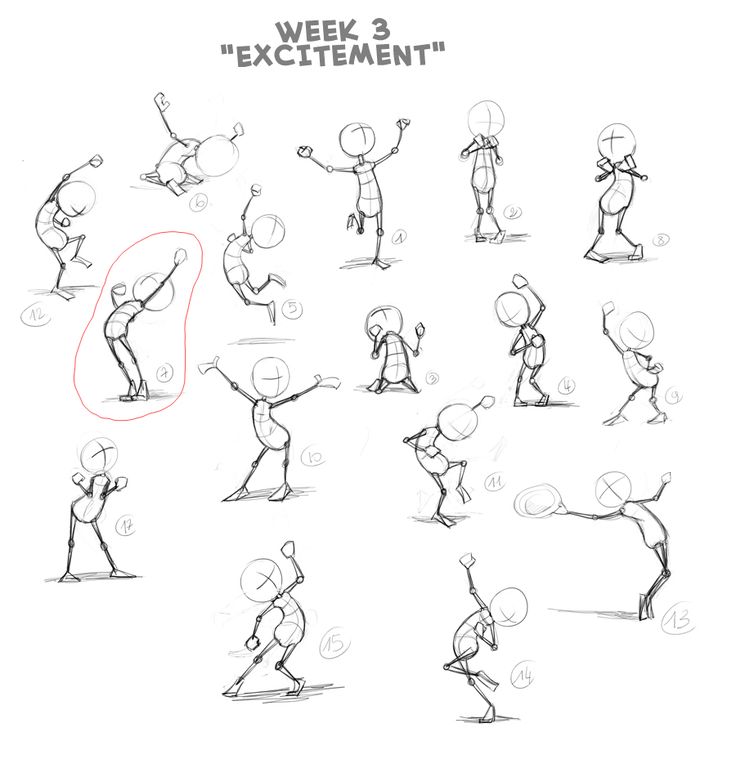
PART 2: POSES: Complete each pose, then add your own style, clothes, design!
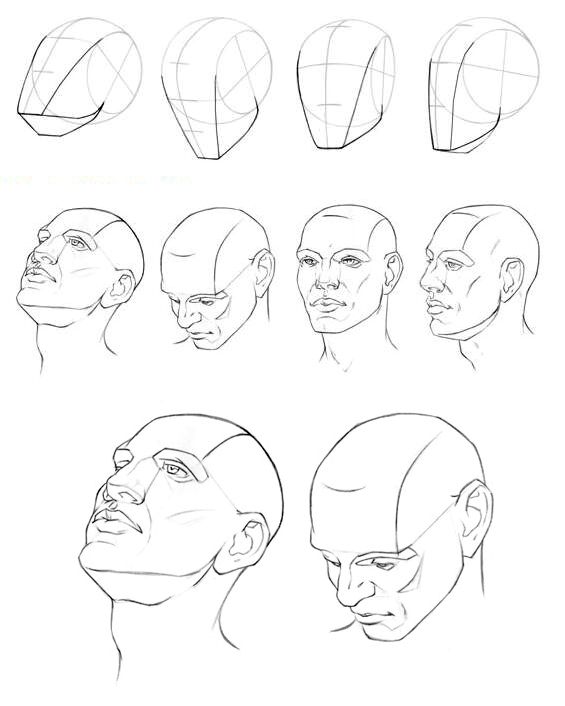
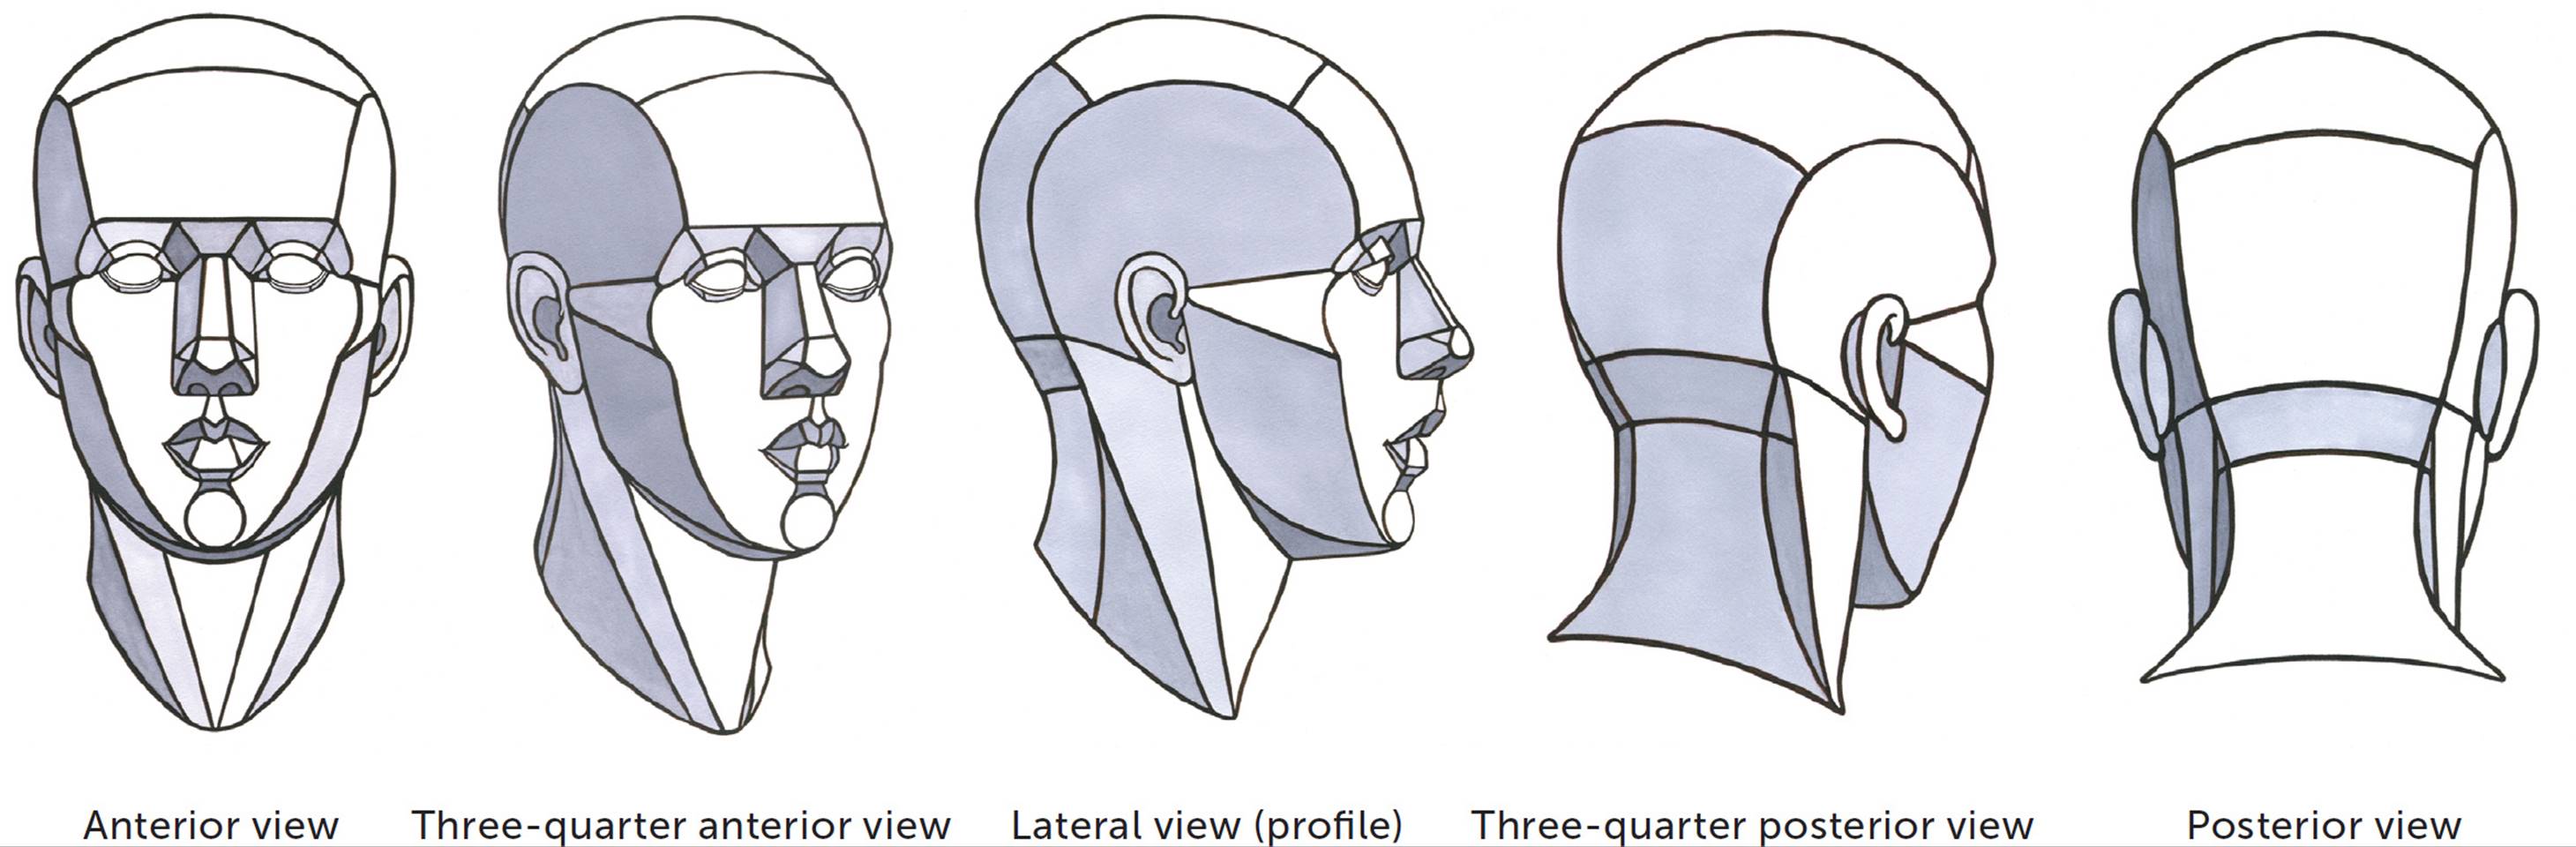
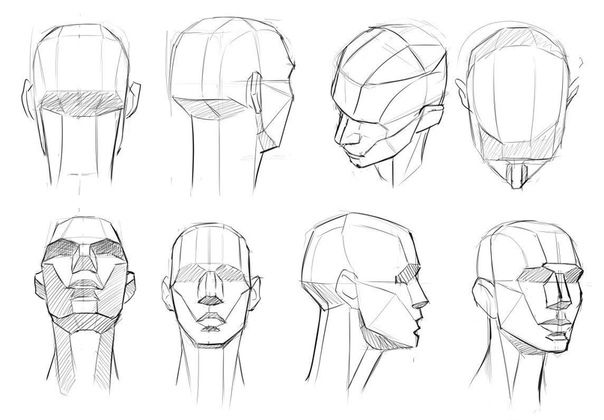
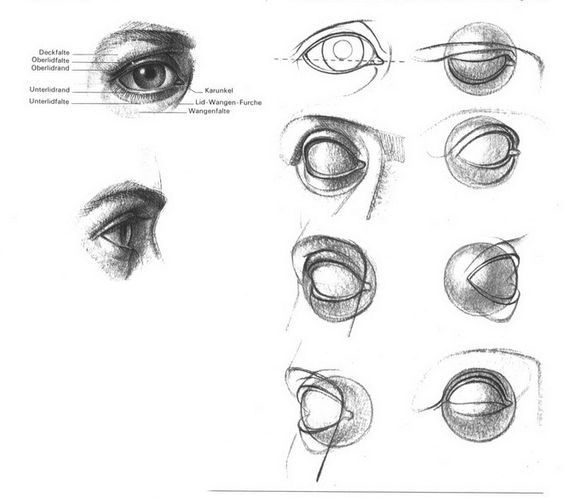
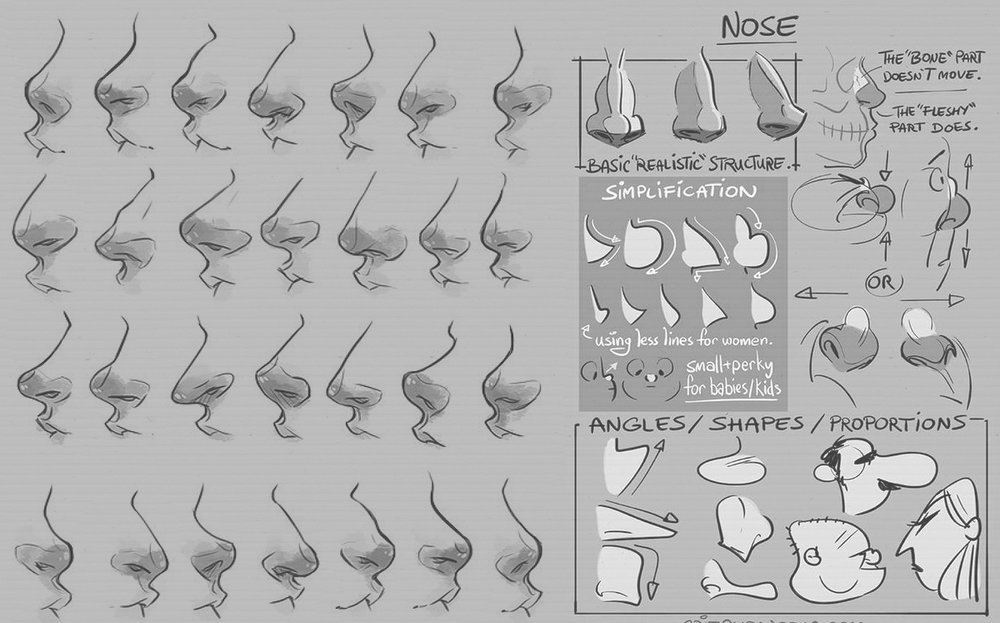
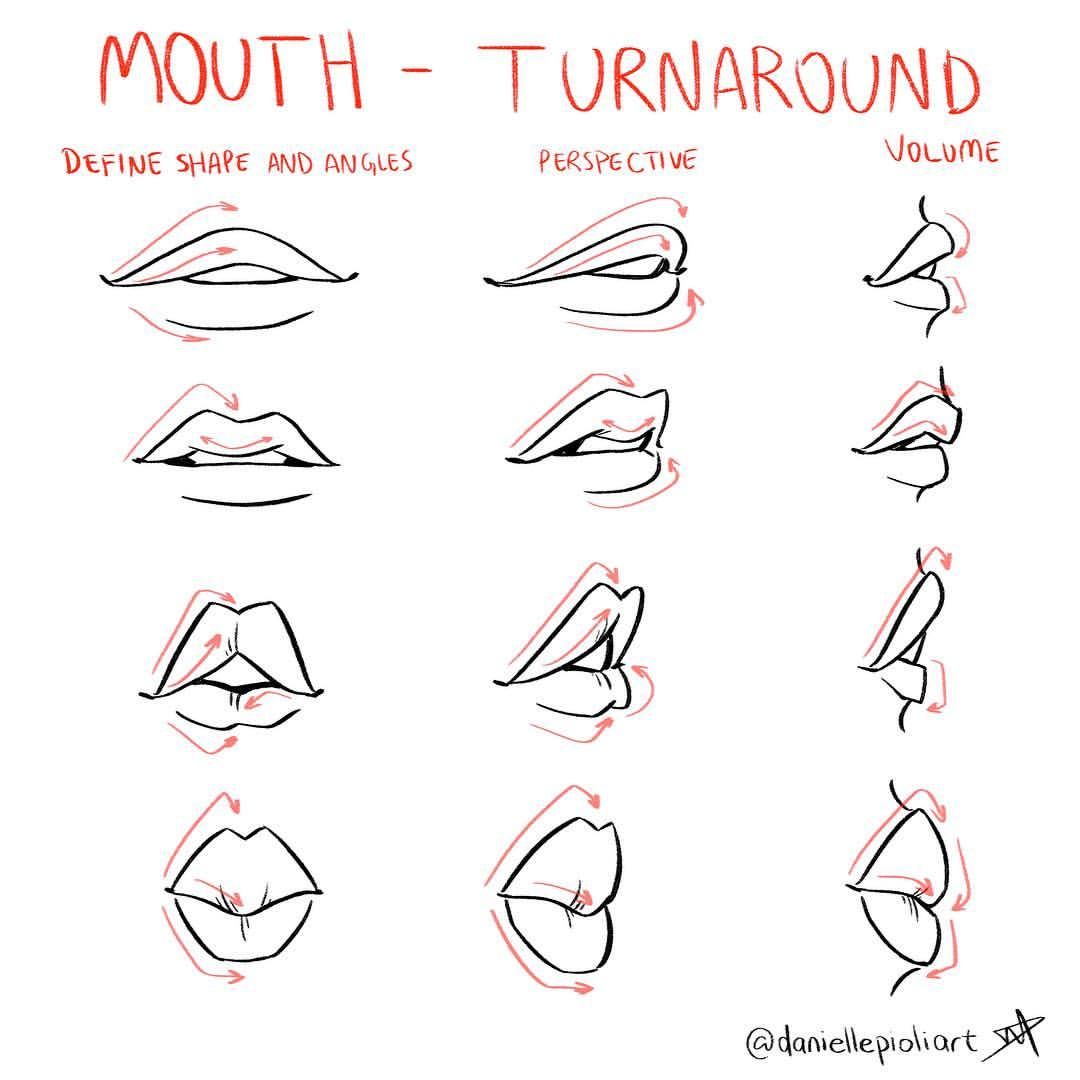
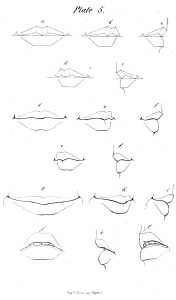
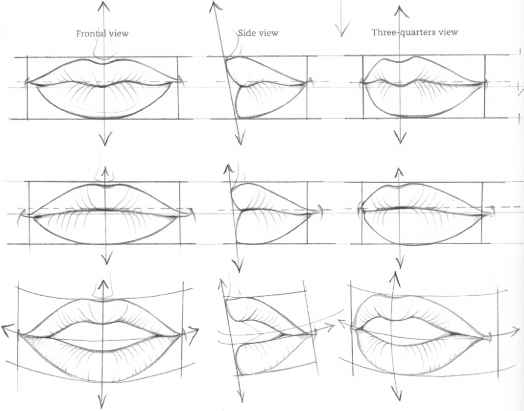
Assignment 9: Face anatomy
Part 1.
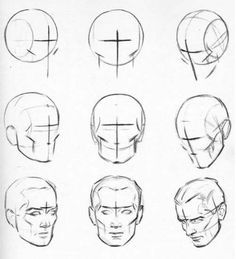
Part 2.: Draw each of the 4 top head breakdown. Add details. Personalize to make your own when done.
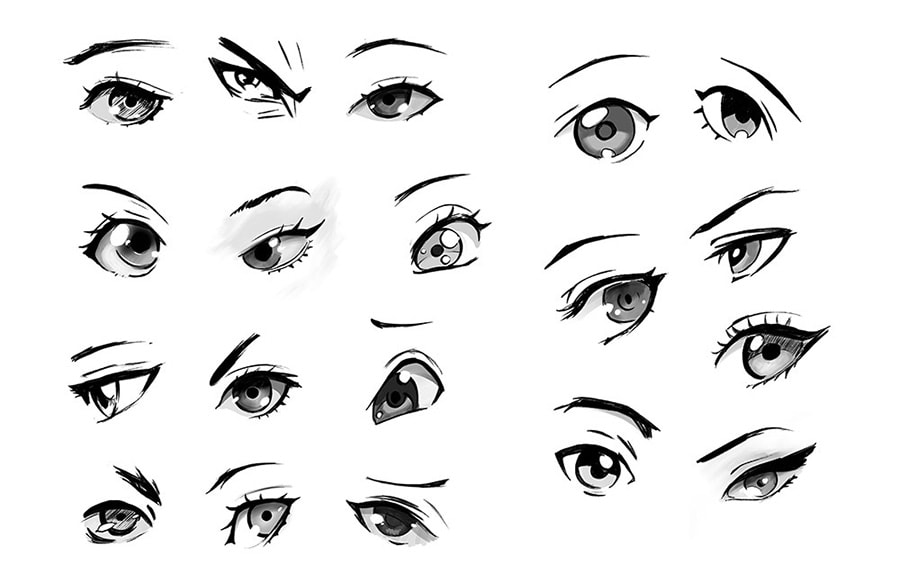
EYES
2. 
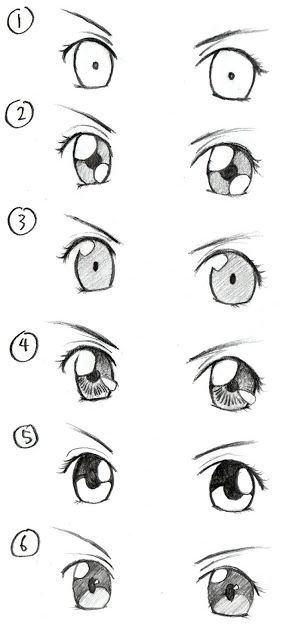
Pick 5 eyes and make them a pair
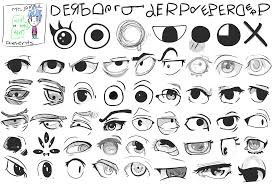
Pick 2 eyes and draw them

Pick 3 eyes and make them a pair
 3. Draw this character using their breakdown
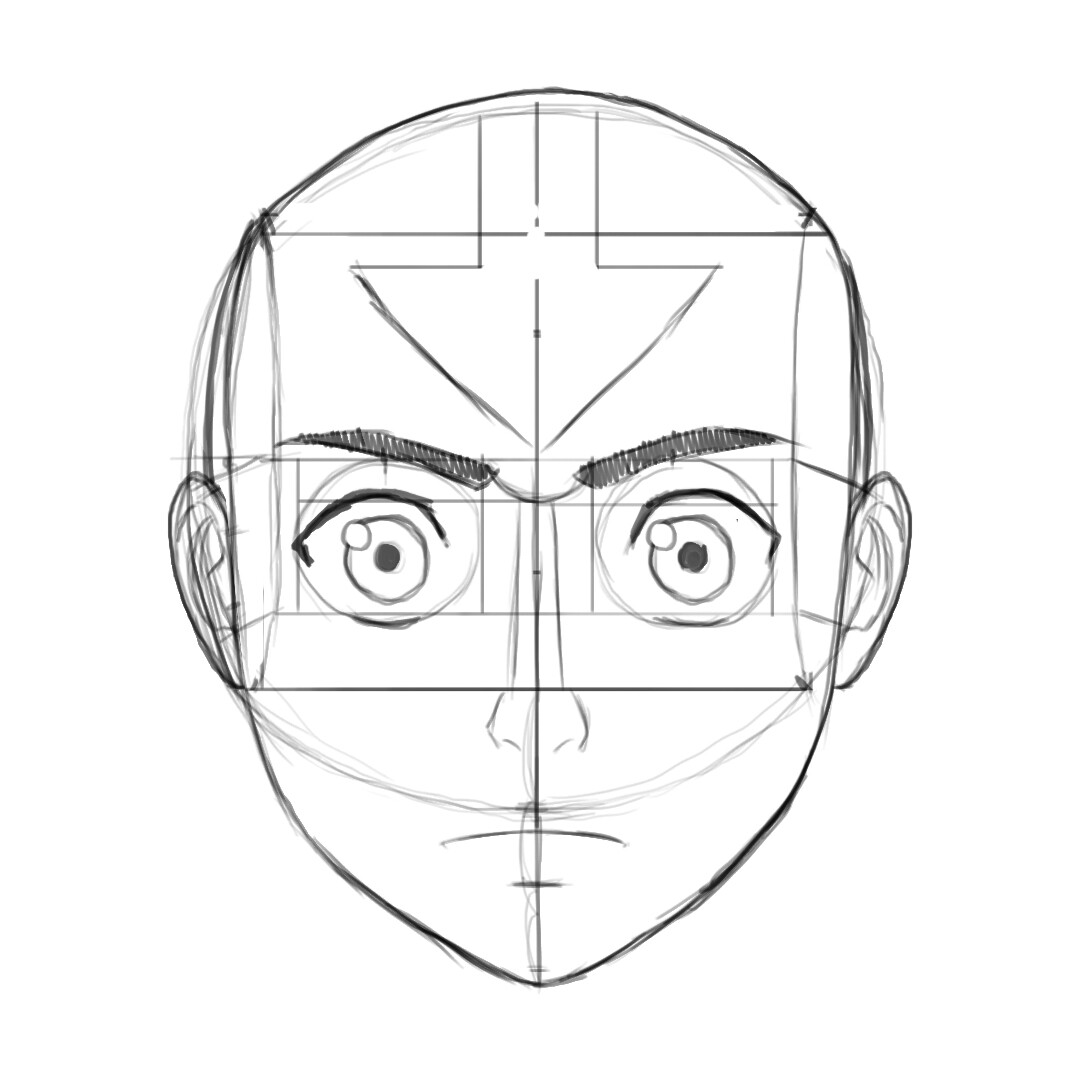 FACIAL FEATURES:

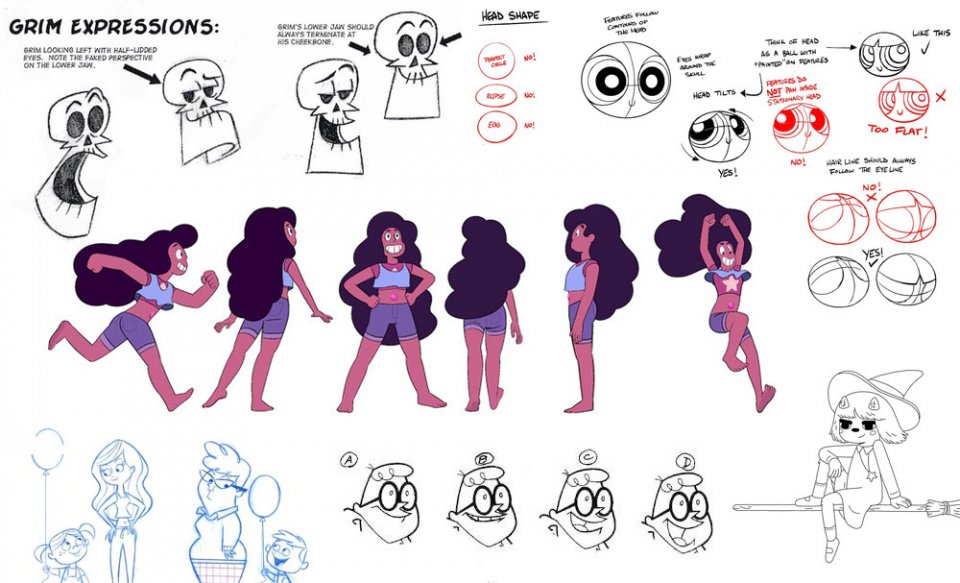
CHARACTER TURNAROUNDS
MUST DO FIRST 2 (1 CRAIG OF CREEK and BOY)
Part 2: CHOOSE HOMER OR CRAIG OF THE CREEK 2


PT 2: PICK A CHARACTER THAT YOU LIKE, DETERMINE WHAT EACH POSE LOOKS LIKE BESED ON THE FRONT VIEW AND CREATE YOUR OWN
CHARACTER MODEL SHEETS
Must do cuphead and donald duck in class: choose one of the two girls for part 2


PICK A CHARACTER YOU LIKE AND CREATE A MODEL SHEET FOR THEM
Assignment 11: Storymaking & storyboarding
Assignment 12: Creating your own VIDEO GAME
Tell me about your game!
Backstory:
Goal:
Character (powers, armor, tools, goals, enemies, purpose)
Assignment 13: Storymaking & storyboarding
For your story
Assignment 14: Character model sheet
Character MODEL SHEET: Draw a model sheet for your character and their game including: poses, items, weapons, tools, sidekicks, potions, foods, etc.


Character Setting (2): Draw their setting! Where does this take place? Is it a side scroller game? Open world? Puzzle game? Let’s see the setting!


Character Walk/Run Cycle:
Lets make a walk cycle
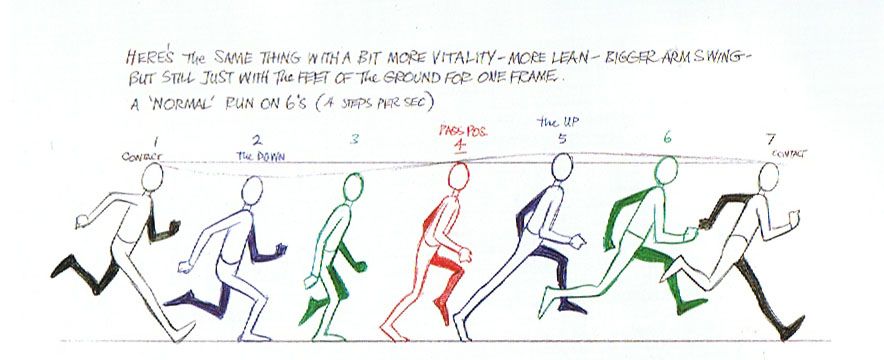
Use one of our run or walk cycle charts to create one for your own character! Make sure to add all their details and change up the run/walk to fit their personality!


